Hosting a website based on Jekyll on AWS is pretty easy and also cost-effective. I’ve described how to do it in a previous blog post. The next step is to automate the actual publishing process as much as possible. This way it becomes really easy to push out updates to your site.
AWS에서 "Jekyll"을 기반으로 웹 사이트를 호스팅하는 것은 매우 쉽고 비용 효과적입니다. 이전 블로그 게시물에서이 작업을 수행하는 방법을 설명했습니다. 다음 단계는 가능한 실제 게시 프로세스를 자동화하는 것입니다. 이런 식으로 사이트에 대한 업데이트를 쉽게 배포 할 수 있습니다.
If you are already managing the code of your Jekyll site in a Source Code Management (SCM) system like git it’s actually pretty easy to automate the whole publishing process. This way the site is updated whenever an update is pushed to the corresponding source code repository. This post is based on the assumption that GitHub is used for hosting the git repository.
git과 같은 소스 코드 관리 (SCM) 시스템에서 Jekyll 사이트의 코드를 이미 관리하고 있다면 실제로 전체 게시 프로세스를 자동화하는 것이 매우 쉽습니다. 이렇게하면 업데이트가 해당 소스 코드 저장소로 푸시 될 때마다 사이트가 업데이트됩니다. 이 글은 GitHub가 git 저장소를 호스팅하는 데 사용된다는 가정을 기반으로합니다.
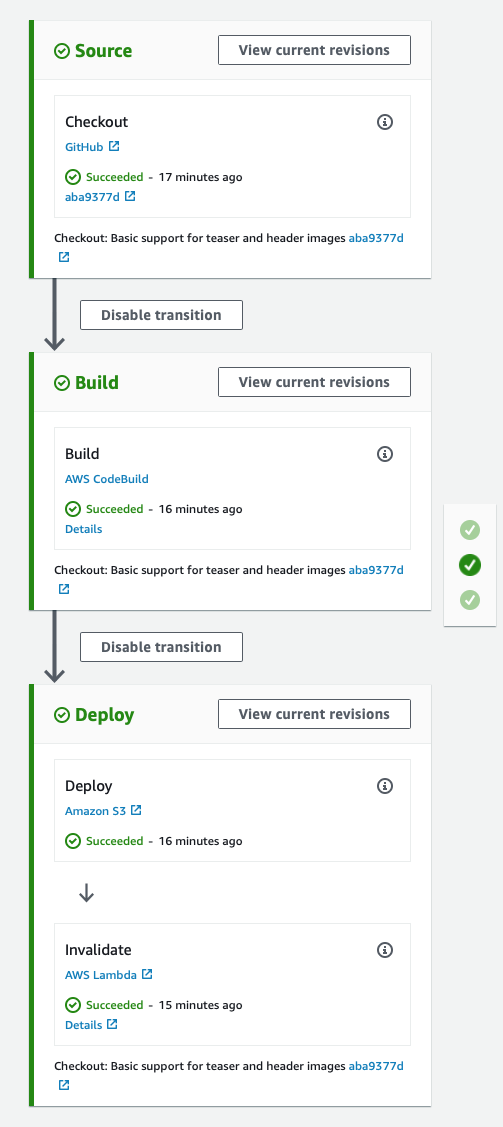
On AWS the services CodePipeline and CodeBuild can be used to set up a so-called CI/CD pipeline. Code Pipeline will be triggered every time a change is pushed to the master branch of the repository of your site. It gets the source code and invokes a CodeBuild project to actually builds the site. Next, it takes the build results and publishes the contents to the S3 bucket used for storing the contents of your site. Finally, you can invalidate the corresponding CloudFront distribution in order to ensure that changed content is immediately delivered to the visitors of your site.
AWS에서는 CodePipeline 및 CodeBuild 서비스를 사용하여 소위 CI / CD 파이프 라인을 설정할 수 있습니다. 코드 파이프 라인은 변경 사항이 사이트 리포지토리의 마스터 지점으로 푸시 될 때마다 트리거됩니다. 소스 코드를 가져와 실제로 사이트를 빌드하기 위해 CodeBuild 프로젝트를 호출합니다. 다음으로 빌드 결과를 가져 와서 컨텐츠를 사이트 컨텐츠 저장에 사용 된 S3 버킷에 게시합니다. 마지막으로 변경된 컨텐츠가 사이트 방문자에게 즉시 전달되도록 해당 CloudFront 배포를 무효화 할 수 있습니다.
I’ve created a CloudFormation template which you can use to create a pipeline for your site within a couple of minutes. The pipeline has the following parameters:
몇 분 내에 사이트의 파이프 라인을 만드는 데 사용할 수있는 "CloudFormation 템플릿"을 만들었습니다. 파이프 라인에는 다음과 같은 매개 변수가 있습니다.
- repository details (owner, name, branch)
- the name of the S3 bucket to which the contents will be published
- the ID of the CloudFront distribution which will be invalidated
- 저장소 세부 사항 (소유자, 이름, 지사)
- 내용이 게시 될 S3 버킷의 이름
- 무효화 될 CloudFront 배포의 ID
Since the pipeline should be triggered whenever a change is pushed to the repository it is necessary to connect it to GitHub. This is done by providing a Personal Access Token you need to create in GitHub. The CloudFormation template expects it to be stored in the Parameter Store of the AWS Systems Manager. How to create the token is described in the GitHub documentation. The token is then stored in the Parameter Store with the path /github/personal_access_token. You can use the AWS CLI to store the token:
파이프 라인은 변경 사항을 리포지토리로 푸시 할 때마다 트리거되어야하므로 GitHub에 연결해야합니다. GitHub에서 생성해야하는 개인용 액세스 토큰을 제공하면됩니다. CloudFormation 템플릿은 AWS Systems Manager의 Parameter Store에 저장 될 것으로 예상합니다. 토큰 생성 방법은 GitHub 설명서에 설명되어 있습니다. 그런 다음 토큰은 / github / personal_access_token 경로와 함께 매개 변수 저장소에 저장됩니다. AWS CLI를 사용하여 토큰을 저장할 수 있습니다.
aws ssm put-parameter --name /github/personal_access_token \
                      --value YourToken \
                      --type String \
                      --region us-east-1
Important: The token must be stored in the same region in which you want to set up your pipeline. And your pipeline must be set up in the same region in which the S3 bucket resides.
중요 사항 : 토큰은 파이프 라인을 설정하려는 동일한 지역에 저장해야합니다. 또한 파이프 라인은 S3 버킷이있는 동일한 지역에 설정해야합니다.
With all the required information at hand and the personal access token stored to the Parameter Store you create the pipeline by launching a new CloudFormation stack based on the aforementioned template with the click of a button:
필요한 모든 정보와 매개 변수 저장소에 저장된 개인 액세스 토큰을 사용하면 위에서 언급 한 템플릿을 기반으로 버튼을 클릭하여 새 CloudFormation 스택을 시작하여 파이프 라인을 생성 할 수 있습니다.

The CloudFormation template already contains a basic build specification to instruct CodeBuild how to build a Jekyll site. It looks like this:
CloudFormation 템플릿에는 CodeBuild에 Jekyll 사이트를 구축하는 방법을 지시하는 기본 빌드 사양이 이미 포함되어 있습니다. 다음과 같이 보입니다 :
version: 0.2

phases:
  install:
    commands:
      - bundle install
  build:
    commands:
      - JEKYLL_ENV=production bundle exec jekyll build

artifacts:
  base-directory: '_site'
  files:
    - '**/*'
As you can see the first step for building the site is to install all the dependencies of your Jekyll project. Next, the familiar jekyll build command is executed to generate the contents of your site. Finally, the generated content in the _site folder is packaged as the output of the build project. This output is then used by CodePipeline to push it to the specified S3 bucket.
사이트를 구축하기위한 첫 번째 단계는 Jekyll 프로젝트의 모든 종속성을 설치하는 것입니다. 다음으로, 익숙한 jekyll build 명령이 실행되어 사이트의 컨텐츠를 생성합니다. 마지막으로 _site 폴더에서 생성 된 컨텐츠는 빌드 프로젝트의 출력으로 패키지됩니다. 그런 다음이 출력은 CodePipeline에서 지정된 S3 버킷으로 푸시하는 데 사용됩니다.
That’s it! With this simple setup, your Jekyll site is published within minutes whenever you push updates to the master branch.
그게 다야! 이 간단한 설정으로 Jekyll 사이트는 마스터 브랜치로 업데이트를 푸시 할 때마다 몇 분 안에 게시됩니다.
The template can easily be modified to integrate with other source code providers like AWS CodeCommit or build other kinds of applications to provide the content, like Angular or React.
템플릿은 AWS CodeCommit과 같은 다른 소스 코드 공급자와 통합하거나 Angular 또는 React와 같은 컨텐츠를 제공하는 다른 종류의 애플리케이션을 구축하도록 쉽게 수정할 수 있습니다.