

import json
import boto3
import os
import datetime
from botocore.exceptions import ClientError


# Pinpoint Project Id
application_id = "4fcac97e77254e918fa8f9d919afde1e"

region = os.environ['AWS_REGION']
client = boto3.client('pinpoint',region_name=region)

def get_segment_id(segment_name):
    try:
        response = client.get_segments(
            ApplicationId=application_id
        )
        segment_list = response['SegmentsResponse']['Item']
        for one in segment_list:
            if one['Name'] == segment_name:
                segment_id = one['Id']
    except ClientError as e:
        print(e.response['Error']['Message'])
    else:
        print(segment_id)
        # print(json.dumps(response))
    return segment_id

def create_campaign(title, message, segment_id, icon_url, image_url):
    print(segment_id)
    try:
        response = client.create_campaign(
            ApplicationId=application_id,
            WriteCampaignRequest={
                'MessageConfiguration': {
                    'DefaultMessage': {
                        'Action': 'OPEN_APP',
                        'Body': message,
                        'Title': title,
                        'ImageIconUrl': icon_url,
                        'ImageUrl': image_url
                        # 'ImageUrl': 'http://www.earlyadopter.co.kr/wp-content/uploads/2019/11/apple-airpods-pro-early-adopter-review-1.jpg'
                        # 'MediaUrl': 'https://m.media-amazon.com/images/G/01/kindle/merch/2019/ONTHEGO/19951312/PUGE0013_Amazon_Puget_US_REV_2019_45_HD-forDP.mp4?_=1'
                    },
                },
                'Name': title,
                'Description': "캠페인 메시지",
                'SegmentId': segment_id,
                'Schedule': {
                    'StartTime': "IMMEDIATE"
                    # 'Frequency': 'ONCE',
                    # 'StartTime': datetime.datetime.utcnow().replace(tzinfo=datetime.timezone.utc).isoformat()
                }
            }
        )
    except ClientError as e:
        print(e.response['Error']['Message'])
    else:
        print (json.dumps(response))

def lambda_handler(event, context):
    if "body" in event:
        event = json.loads(event['body'])

    # Query parmeters
    title = event["title"]
    message = event["message"]
    segment = event["segment"]
    icon_url = event["icon"]
    image_url = event["image"]

    segment_id = get_segment_id(segment)
    response = create_campaign(title, message, segment_id, icon_url, image_url)

    return {
        'statusCode': 200,
        'body': json.dumps({'result': response}),
        'headers': {
            'Content-Type': 'application/json',
            'Access-Control-Allow-Origin': '*'
        }
    }
|
매개 변수중 Schedule에 있는 StartTime에 따라서 즉시 보낼 것인지, 특정 시간에 보낼 것인지 정해야 합니다.
Python boto3에서 제공하는 기능은 다음 문서에서 확인할 수 있습니다: https://boto3.amazonaws.com/v1/documentation/api/latest/reference/services/pinpoint.html
{
  "segment": "cart",
  "title": "안녕하세요 {{User.UserId}}님",
  "message": "신제품 Echo Bud를 소개 합니다.",
  "icon": "https://apprecs.org/ios/images/app-icons/256/6d/580990573.jpg",
  "image": "https://pplware.sapo.pt/wp-content/uploads/2019/09/Amazon_Echo_Buds_02.jpg"
} |
하단의 {account-id}는 본인 account-id(12자리 숫자)로 치환해야 하며, 아래는 테스트를 위해서 임의로 간단하게 구성한 예입니다.
{
    "Version": "2012-10-17",
    "Statement": [
        {
            "Sid": "VisualEditor0",
            "Effect": "Allow",
            "Action": [
                "logs:CreateLogStream",
                "logs:PutLogEvents"
            ],
            "Resource": "arn:aws:logs:us-east-1:{account-id}:log-group:/aws/lambda/PinpointPushTest:*"
        },
        {
            "Sid": "VisualEditor1",
            "Effect": "Allow",
            "Action": "mobiletargeting:*",
            "Resource": "*"
        },
        {
            "Sid": "VisualEditor2",
            "Effect": "Allow",
            "Action": "logs:CreateLogGroup",
            "Resource": "arn:aws:logs:us-east-1:{account-id}:*"
        }
    ]
} |
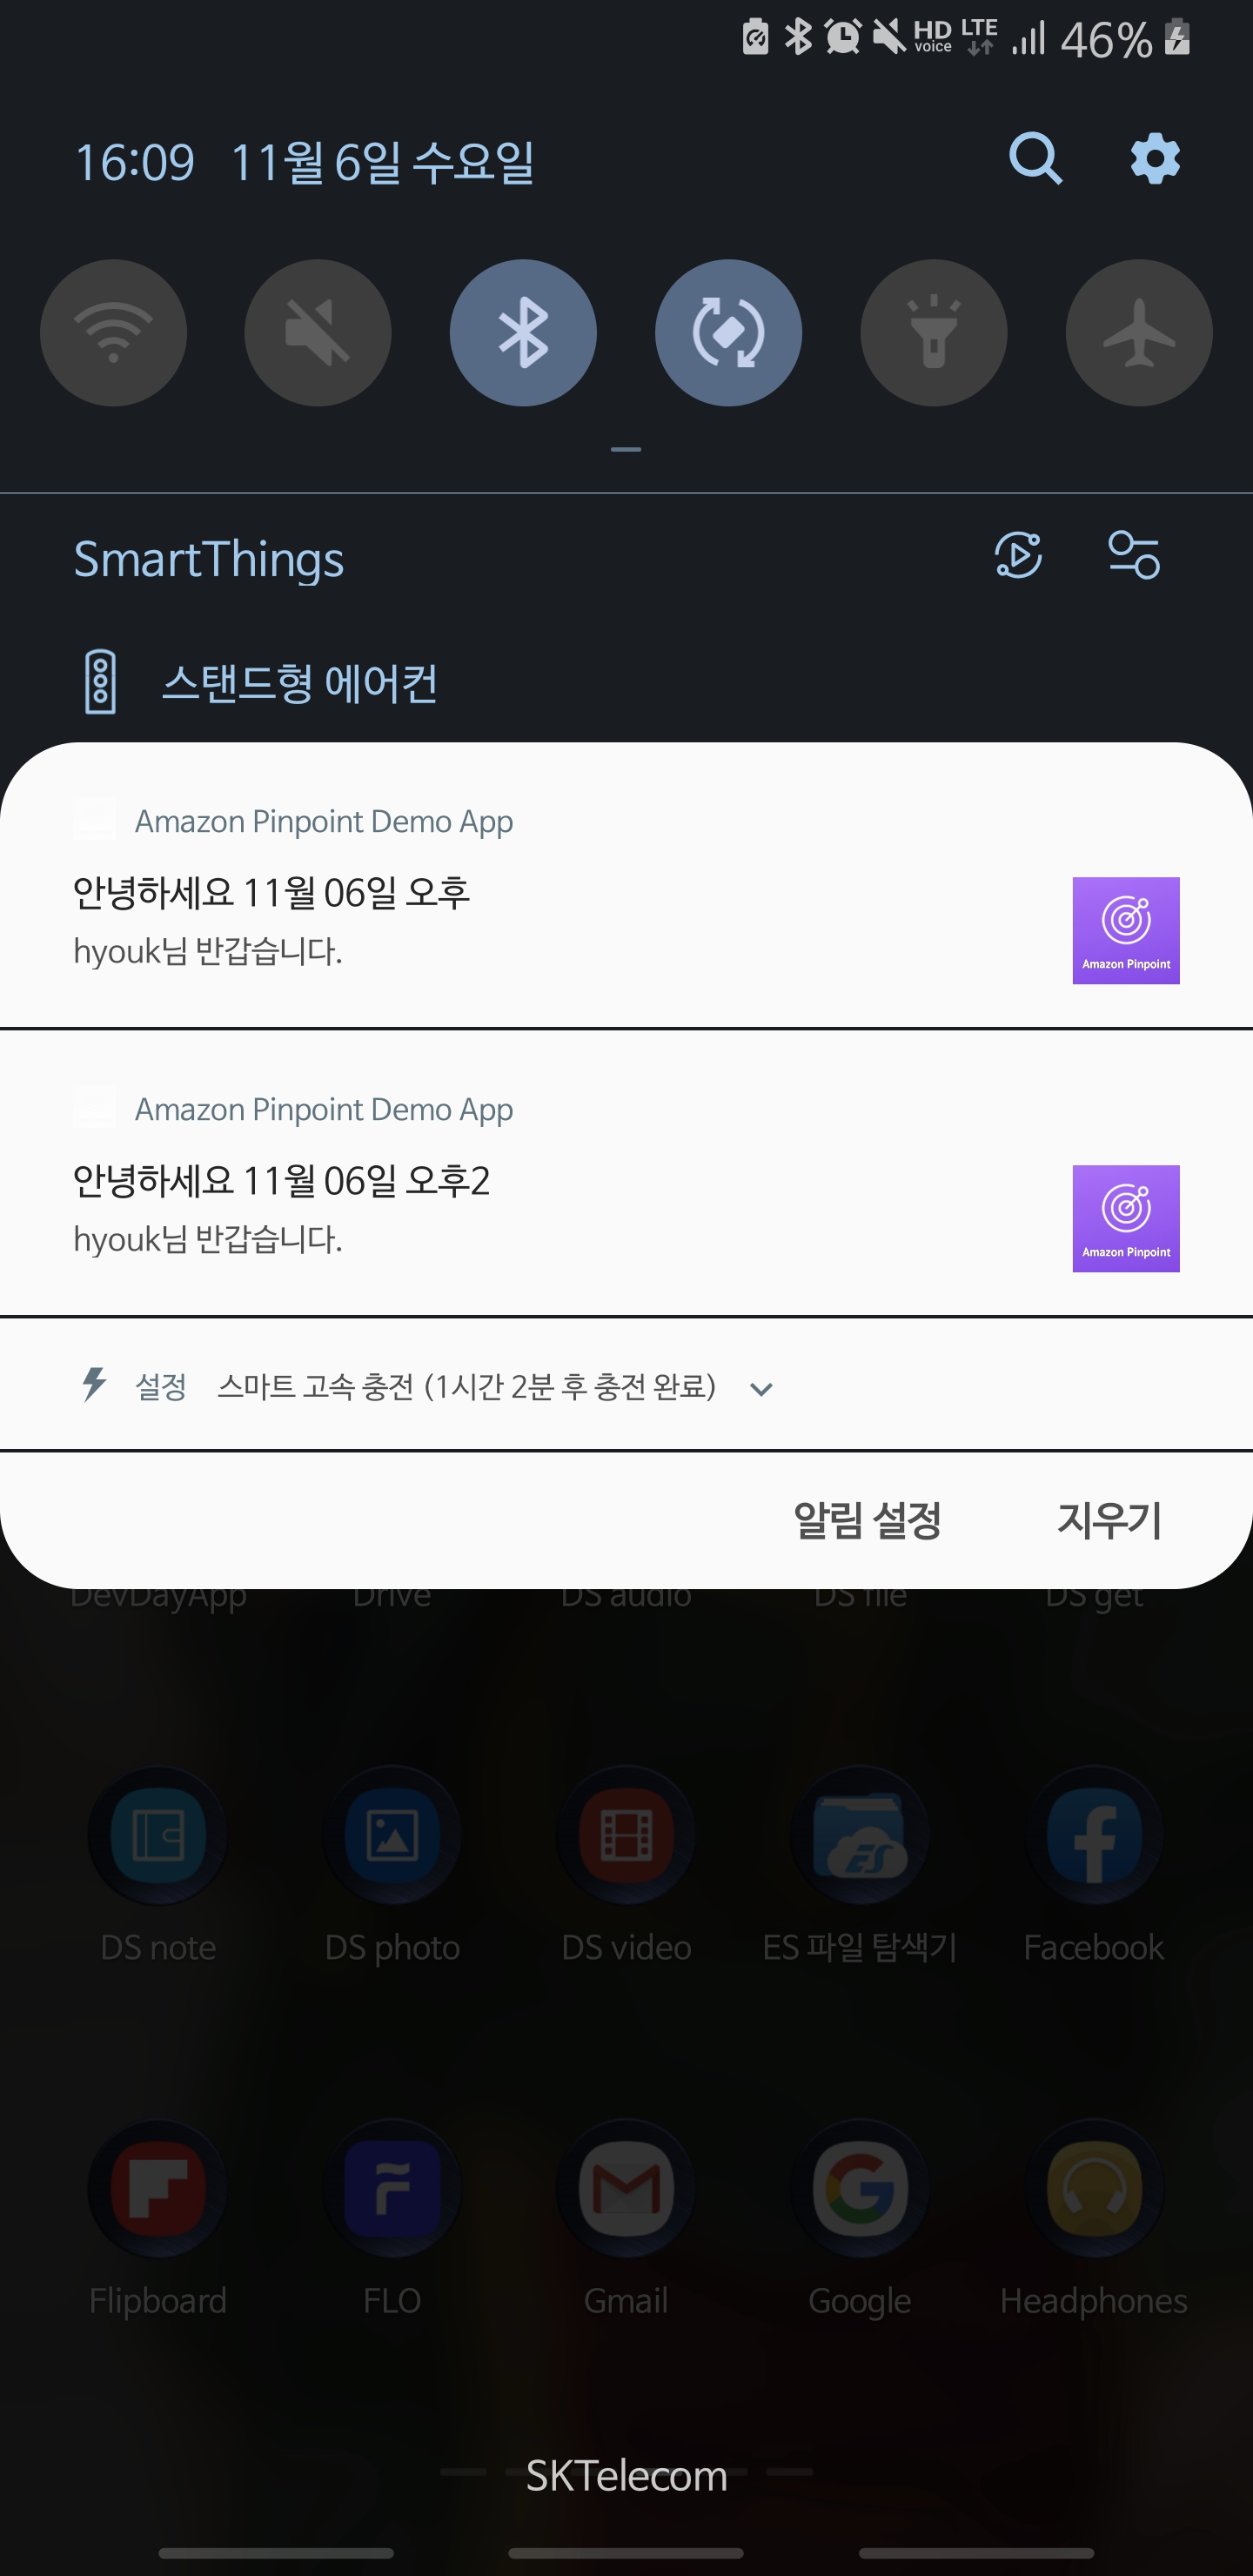
1개는 시간대를 지정하여 발송하고, 하나는 즉시 발송하였습니다.
작성중
작성중
마케팅을 위한 워크플로우를 시각화 도구를 이용해서 쉽게 구성할 수 있습니다: https://aws.amazon.com/ko/pinpoint/features/engagement-management/journeys/

| 채널 | 트랜잭션 메시지 요금 | 캠페인 또는 Journey 기반 메시지 요금 (MTA 요금 별도 청구) |
|---|---|---|
| 이메일 | $1 / 10,000개 | $1 / 10,000개 |
| 푸시 알림 | $1 / 1,000,000개 | $1 / 1,000,000개 |
| SMS | 한국 국가별 상이, SMS 요금 도구를 참조. | 한국 |
그 외 채널로의 메시지 전송 방법은 Lambda를 이용합니다: https://docs.aws.amazon.com/pinpoint/latest/developerguide/channels-custom.html
MTA 요금 추가 적용: 캠페인 기반 메시지의 경우, 최초 MTA 5,000개 엔드포인트에 대해서는 $0, 이후 1,000개당 1.20 USD 과금 (하단 월 사용자 정보 관리 참고)
1,000개 기준 1.2원 (1,172.59원/$1 기준)
매월 수집하는 처음 100,000,000개의 이벤트에 대해 0 USD, 그 후 수집하는 이벤트에 대해 이벤트당 0.000001 USD를 지불합니다. → 1,172.59 = 0.0012원
AWS Mobile SDK를 사용하여 애플리케이션 사용 데이터를 수집하는 경우, 매월 수집하는 애플리케이션 이벤트 수에 따라 요금이 부과됩니다.
애플리케이션 이벤트는 캠페인 이벤트(푸시 알림의 링크 클릭 등)와 모바일 앱을 사용할 때 기록되는 이벤트(앱 열기 등)를 포함합니다.
활성화된 타겟 Audience 1 기준 = 1.41원 (1,172.59원/$1 기준)
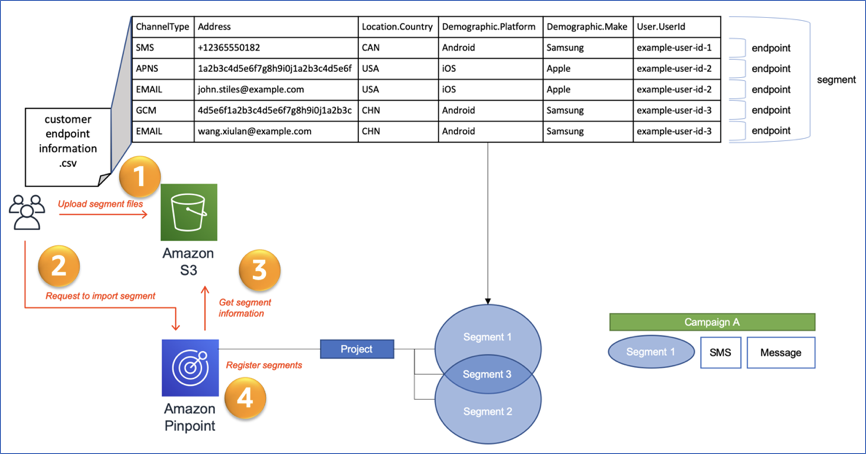
엔드포인트는 개별 고객의 메시징 대상으로, 이메일 주소, 휴대폰 번호 또는 디바이스 식별자를 예로 들 수 있습니다. (User.UserId 기준 최대 10개의 Endpoint를 등록 할 수 있습니다.)
30일 기간 동안 접촉한 엔드포인트 총수를 월별 목표 대상(MTA)이라고 합니다. 캠페인 메시지를 발송할 때는 다음 요금을 지불합니다.
천 만개 이상일 경우 프라이빗 요금 상의
'use strict';
console.log('Loading function');

exports.handler = async (event, context) => {
    /* Process the list of records and transform them */
    const output = event.records.map((record) => {
        const entry = (new Buffer.from(record.data, 'base64')).toString('utf8');
        var json_data = JSON.parse(entry);
        json_data.event_timestamp   = new Date(json_data.event_timestamp).toISOString();
        json_data.arrival_timestamp = new Date(json_data.arrival_timestamp).toISOString();
        console.log(json_data);
        const result = JSON.stringify(json_data) + '\n';
        const payload = (new Buffer.from(result, 'utf8')).toString('base64');

        /* Transformed event */
        return {
            recordId: record.recordId,
            result: 'Ok',
            data: payload,
        };
    });
    console.log(`Processing completed.  Successful records ${output.length}.`);
    console.log(output);
    return { records: output };
}; |
이벤트 발생한 시간을 UNIX 시간에서 ISO 포맷으로 변경하는 예
참고: https://aws.amazon.com/blogs/compute/amazon-kinesis-firehose-data-transformation-with-aws-lambda/
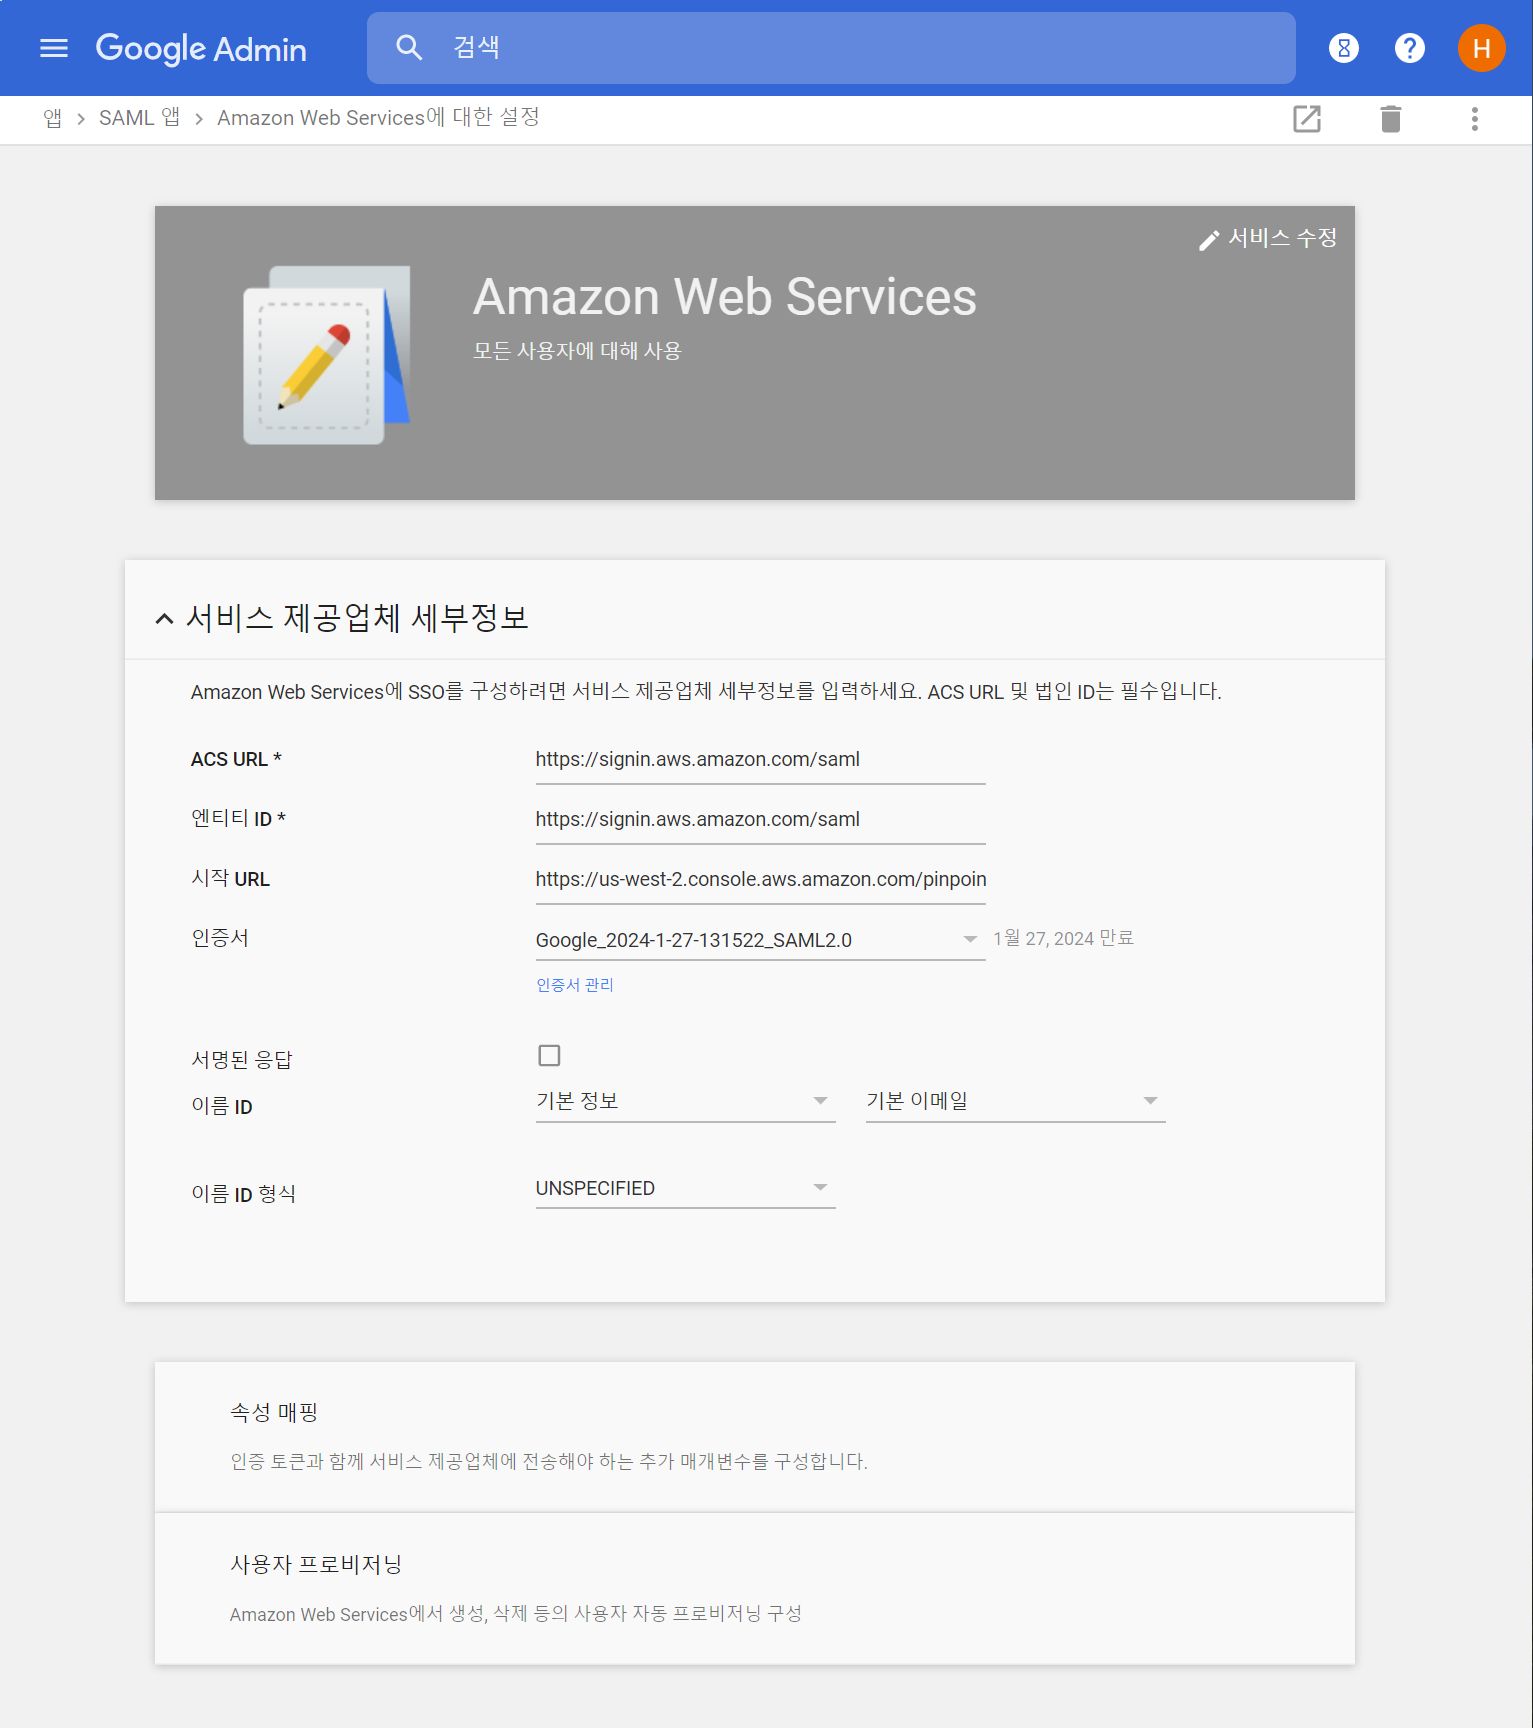
Login 하면 바로 AWS Pinpoint 메시지 보내는 화면으로 시작하기: 로그인 직후 시작 URL에 해당 캠페인으로 URL 구성

사례 소개: https://aws.amazon.com/ko/solutions/case-studies/hyundai-departmentstore/
640만 가입자, 일 App 사용자 10만, 월 기준 40만 (실제는 40만 + 인당 Device 개수(App이 설치된 경우)) - 2019년 4월 Summit 기준
PPT 자료: https://www.awsdemokr.com/pinpoint/amazonpinpointpr.pdf
AWS Digital User Engagement Architecture 소개WIKI: https://cdk.awsdemokr.com/duedg
모바일을 위한 워크샵: https://cdk.awsdemokr.com/mobilehol
이메일을 위한 실습 및 분석: https://cdk.awsdemokr.com/pinpoint201
Pinpoint는 캠페인 툴이면서, 고객 행동 분석을 위한 시작점입니다.
따라서 아래와 같이 서버리스 개념과 데이터 분석 플랫폼을 만드는 방법을 같이 고객이 알고 있으면 도움이 됩니다.
자습 형태로는 아래와 같이 하나씩 순서대로 진행해 보시면 좋습니다.
1) REST API로 Pinpoint를 호출하기 위하여 사전 학습해야 할 내용
서버리스 개념, 기초 실습, DevOps실습 이렇게 3가지로 나누어서 진행하면 1번째 부분에 대한 이해를 하실 수 있고 이후 추가로 직접 개발할 수 있습니다.
- 서버리스 개념 학습(40분): https://www.youtube.com/watch?v=6GmnBkHf1Xo
- 서버리스 기초 실습(60분): https://cdk.awsdemokr.com/serverless201
- 서버리스 DevOps를 적용한 실습(60분, 미션 1까지만 진행): https://cdk.awsdemokr.com/devops301lab2
2) Android용 Push Notification 환경 만들기
App Push Notification로 메시지를 전송하기 위해서는 App을 개발하는 작업이 필요합니다.
Amplify 페이지에서 Push Notification을 사용하기 위한 설정 방법이 플랫폼 별로 설명되어져 있습니다.
위 모바일 워크샵(https://cdk.awsdemokr.com/mobilehol)을 참고해서 환경 설정을 할 수 있습니다.
3) Pinpoint를 이용한 메시지 발송
AWS 관리 콘솔에서 Pinpoint를 이용해서 캠페인 메시지를 발송합니다.
Korea SA 팀 차원에서 도움 드릴 수 있는 부분
Oppty 기반 Solutions Architect 기반 1일차 교육 세션들
1) Standard Immersion Day: EC2, VPC, S3, RDS
2) Serverless Immersion Day: Lambda, API Gateway, DynamoDB, SNS
3) Big Data Immersion Day: Kinesis, Glue, S3, Athena, QuickSight, Redshift, EMR
4) Mobile Immersion Day: Amplify, Cognito, AppSync, Pinpoint (for Android)
카카오톡 알림톡 활용
Amazon Pinpoint SMS 대신 카카오톡 알림톡을 활용합니다. 중간에 파트너를 통해서 메시지를 전송합니다.

화면 목업아키텍처 다이어그램직접 메시지 보내는 UI 구축 예
sample: https://github.com/aws-samples/amazon-quicksight-embedding-sample
|
d